Loopy Pro: Create music, your way.
What is Loopy Pro? — Loopy Pro is a powerful, flexible, and intuitive live looper, sampler, clip launcher and DAW for iPhone and iPad. At its core, it allows you to record and layer sounds in real-time to create complex musical arrangements. But it doesn’t stop there—Loopy Pro offers advanced tools to customize your workflow, build dynamic performance setups, and create a seamless connection between instruments, effects, and external gear.
Use it for live looping, sequencing, arranging, mixing, and much more. Whether you're a live performer, a producer, or just experimenting with sound, Loopy Pro helps you take control of your creative process.
Download on the App StoreLoopy Pro is your all-in-one musical toolkit. Try it for free today.
GeoShred Experiment #10

The latest in an infrequent series of experiments using a single instance of GeoShred to control multiple instruments.
In this case the instruments were Roli Noise (November Rain Guitar Lead, String and Horns, Lemon Bell and Fluid Acoustic Bass) and Roli Drums (Ambient Beats Groove Kit). Everything played in one take with no edits.
ScaleBud 2 is used to create chords for the Strings and Horns.
Other effects are Attack Softener, TB Reverb, MU Filter, Velvet Machine, FAC Alteza, LRC7 and MixBox.

Comments
I'm always amazed that you can do such polished improvs; especially with the complexity of this set up. I'd like to hear more about how you connected it all. Does each geoshred string have a different channel? For all the apps in there, its stays clear.
Very cool!
Cheers @MrStochastic and @FriedTapeworm !
Yes MrS, each string goes to a different channel, top string is channel 2, bottom string in 7, so in this case…
2 > Guitar Lead
3 > Guitar Lead
4 > Scaler 2 (to generate chords) > Strings
5 > Scaler 2 (chords) > Strings & Bell
6 > Bass
7 > Bass
All channels > Percussion
GS keyboard was modified so that the 3 sets of 2 strings had the same layout to make playing a bit easier (I think 🤔)
Is that low C note latched, or do you have to hold it down during the whole jam?
Held it down @Coloobar , left hand thumb, nothing else to do with it 😊
On a slightly more serious note I would like to work out a GeoShred solution for latching certain instruments and not others…
Seems like you should be able to latch it within the specific synth that you're sending the note to, if it has that feature.
It never ceases to amaze me how many ways you have found to use GeoShred. Wizdom music should put you on their payroll.
I know what you mean @Coloobar but I was thinking of latching / unlatching individual instruments while playing… just need some extra fingers 😊
Thanks Mac ( @MadeofWax )… they couldn’t afford me 💰
Superb!
Thanks for the comment and bump 🐪 @des1303
Missed this first time around. Glad it got bumped!
Beautiful and inspiring as we’ve come to expect from you Tony!
… and I fall for it every time, when I see you using that Roli Noise app lol.. I go “ah yes, Roli Noise!” I launch it, and try to get the IAP sounds, but of course they no longer work, or are no longer available. (And of course I don’t own any Roli hardware) I’ll fool around with it for a few minutes and eventually give up.
@GeoTony
Hi Tony. Great use of GeoShred as a controller beyond a single instrument controller surface.
There’s a latch module included in Victor Porof’s MIDI Tools bundle. The only option is Unlatch after Retrigger which is a toggle. Might stave off carpal tunnel syndrome?
Thanks @Edward_Alexander and @AndyHoneybone 🙏
Edward is it that you’ve changed devices and left them behind? I know the IAPs are no longer available if you’ve lost them.
Or is that you have them and can’t access them. I have to open, close and reopen the Noise window before the IAPs show.
Thanks for the tip Andy 👍
@GeoTony could you outline in a bit more detail how you did the multi-instrument setup? I can’t even imagine it despite your outline above. LoopyPro user, but will try to map from your setup. Thanks!
Really good! So much going on, but really has a coherence and feeling of composition!
Nice way to show that GeoShred is in a class by itself if you put in the time mastering it's secrets.
I would tackle the latching with Mosaic scripting... Someone has already written it, I think. But you wouldn't get the visual clues you get by holding a key... And then there's that app someone mentioned too.
Does that other keyboard app have latching? Visual Keyboard as I recall.
Did you use Scalar 2 or ScaleBud?
Maybe a 4 button Bluetooth keyboard that provides sustain pedal per channel would be a nice live playing option. Butter and close enough to press up to at once.
Have the developers created new features on request for you since you probably sell a few extra copies with every demo? Would be nice to add latching on a per row basis for just such a use case.
If you glue a copper wire to a dime and connect the wire to your body at some point would the dime hold a note just like your finger? I laid a penny on a note and it plays when touched so we need a conductive path.. that could be an 'analog' latch. I only have an iPhone today and no way to get wire...
I tried aluminum foil balls to simulate pedal buttons once and I think that worked for shoeless touches like the typical guitar pedals.
Is there a physics boffin around to propose materials to create extra touch options?
I have too much time on my hands. I need to be NG more gear to the hospital for these 12 hours shifts.
Google Gemini suggests these DIY analog options:
This is a common desire for musicians using touch-based music apps on iPhones! You want to sustain a note on a virtual MIDI keyboard while being free to adjust parameters, trigger samples, or play other parts with your other hand.
Since you're looking for a physical way, we're talking about a mechanism that can hold down a specific point on the capacitive touchscreen. Here are several approaches, from DIY to more advanced, along with their pros and cons:
1. DIY Capacitive Stylus/Holder
The iPhone's screen works by detecting changes in the electrical field. Your finger is conductive, and so are certain materials.
* Simple "Sticky Finger" Method:
* Concept: Use a material that mimics a finger's conductivity and can be held in place.
* Materials:
* Aluminum Foil: Ball up a small piece of aluminum foil (about the size of your fingertip).
* Tape (non-conductive): Scotch tape or painter's tape.
* Optional: A small piece of sponge or cotton ball.
* How to:
* Make a small, dense ball of aluminum foil.
* (Optional, for better contact and durability): Wrap a small, slightly damp piece of sponge or cotton ball around the foil. The slight moisture helps conductivity.
* Place the foil/sponge ball directly on the MIDI key you want to hold down.
* Use tape to secure the foil/sponge ball in place on the screen. Make sure the tape is only on the edges of the foil/sponge, not covering the part that touches the screen, and doesn't interfere with other touch areas.
* Pros: Extremely cheap, easy to make.
* Cons: Can be finicky, might not always register perfectly, tape can leave residue, not elegant.
* Weighted Conductive Object:
* Concept: Similar to the above, but with a bit more weight to ensure consistent contact.
* Materials:
* A small, conductive object (e.g., a metal washer, a small piece of conductive rubber/foam).
* A capacitive stylus tip (you can buy cheap ones online, or salvage from an old stylus).
* Something to add weight (e.g., modeling clay, fishing weights).
* Adhesive (super glue, hot glue).
* How to:
* Take your chosen conductive object or stylus tip.
* Attach it to a small base (could be a small block of wood, plastic, or even a heavy eraser) that has enough weight to stay put.
* Ensure the conductive part is exposed and designed to press down firmly on the screen.
* You might need to experiment with the pressure to get consistent contact.
* Pros: More stable than just foil, potentially better contact.
* Cons: Requires a bit more crafting, can still be imprecise.
* DIY Stylus with a Stand/Clamp:
* Concept: Fashion a conductive stylus that can be held in place by a small clamp or stand, similar to a mini-tripod.
* Materials:
* Capacitive stylus (or a DIY one as described in search results, e.g., a pen wrapped in foil with the foil making contact with your hand for conductivity).
* A small desk clamp or a flexible mini-tripod (like a GorillaPod).
* Something to attach the stylus to the clamp/tripod (e.g., zip ties, rubber bands).
* How to:
* Create or acquire a stylus.
* Attach the stylus to the clamp or tripod so that its tip can be positioned precisely over the MIDI key.
* Adjust the clamp/tripod to provide sufficient downward pressure for continuous contact.
* Pros: More versatile, can be repositioned easily, relatively stable.
* Cons: Might be bulky, requires careful positioning, stylus needs to be conductive (some require skin contact, which might complicate continuous holding).
2. Specialized Accessories (Less Common, but exist)
* Magnetic Stylus Holders (for MagSafe iPhones): If you have a newer iPhone with MagSafe, you might find or adapt magnetic accessories. You'd still need a conductive tip that extends from the accessory to the screen. This would be more for precise positioning than continuous pressure, unless the accessory itself has a spring-loaded or weighted conductive tip.
* Robot "Finger" Automation: This is overkill for your need, but for professional testing and automation, there are actual robotic arms with conductive tips designed to precisely tap and swipe screens. These are expensive and complex.
Considerations for all Physical Methods:
* Conductivity: The "finger" needs to be conductive. Your skin works because it's conductive. Stylus tips are usually made of special conductive rubber or fabric. DIY methods rely on materials like aluminum foil or slightly damp sponges.
* Pressure: The simulated touch needs to apply enough pressure to register consistently. Too light, and it might drop the note. Too heavy, and it could damage the screen (unlikely with light objects, but be mindful).
* Stability: The holder needs to be stable enough not to shift during your performance, especially when you're moving your hands around.
* Scratching: Ensure whatever you're using to touch the screen is soft and won't scratch it. Stylus tips are designed for this. Aluminum foil or rough materials could potentially scratch.
* Interference: Make sure your physical "finger" and its holder don't block too much of the screen or interfere with your other hand's movements.
Recommendation:
For a quick and dirty solution, start with the aluminum foil and tape method, perhaps with a tiny piece of damp sponge/cotton ball inside the foil for better conductivity. Experiment with the size and density of the foil ball to find what works best for your specific iPhone and app.
If you need something more reliable and reusable, look into getting a cheap capacitive stylus and finding a way to mount it with a small desk clamp or mini-tripod that can hold it in place over the screen. You'd want a stylus with a soft, rounded conductive tip.
Good luck, and happy music-making!
GepShred Experiment #11… DIY metal “11th finger” for IOS.
@geotony Do you play with your iPad flat on a tabletop?
I taped a metal guitar string to a dime and later to a dead watch battery that’s a little larger (CR2032).
The guitar string seems to have a lot of loose electrons… I thought I’d would need to attach the string to my hand put just having the string taped to the battery (or dime… a buckle might be good.
The side of the metal disc needs to be a bit tacky to stay in place. I think a think copper wire might be good
if it’s not rigid… like a stranded wire copper segment. Maybe a pretty short segment might provide the required
free electrons.
Anyway, on a flat surface the disc activates GeoShred and holds a note.
I hope there’s a DIY hacker that might refine the parts list.
@des1303 , here is a video I did a while ago that explains the multi-string to instrument setup.
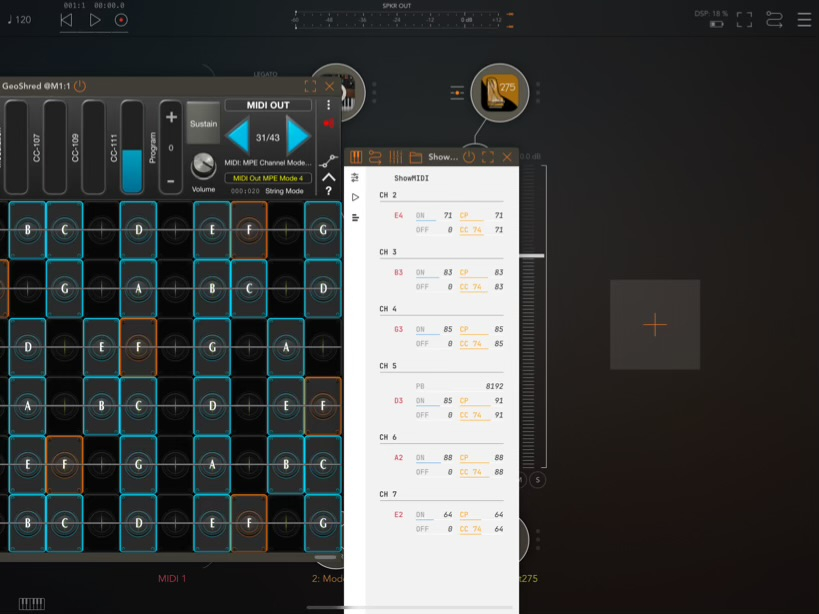
I suggest using the preset MIDI Out MPE Mode 4 as this is a newer midi preset that is compatible with most apps.
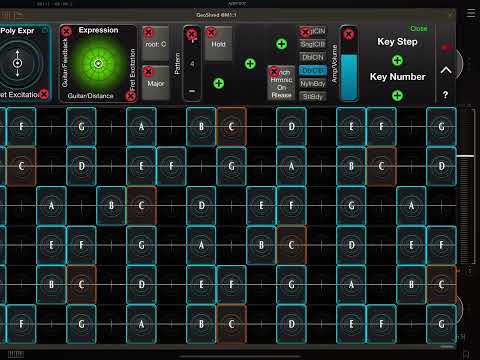
This is a screenshot from this morning showing the string to midi channel mapping
Any problems just shout ☹️
Thanks @michael_m , I’ve just rewatched the video and I surprised myself how musical it was 🤔
Thanks for the posts @McD, hope things go well 👍
Don’t use any other controller so can’t comment about those.
It was ScaleBud 2 that I used.
I’ve just tried coins on the glass and strangely when you touch them, instead of generating notes on channels 2 to 7 (which is what the midi preset is set up for ) it generates them on 9 to 16… weird.
The major problem is that as a hifi buff I’d have to work out which coins produce the best sounds… experiments so far suggest that a £1 coin produces some nice rich bass and a 1p coins is better with the higher pitches. My next step is to cryogenically treat the coins to see if I can align the molecules to aid the passage of electrons which will obviously effect the sound.
Is that multi-channel set up given to the user as a preset or do you need to create your own preset?
It’s a standard preset @mcd, MIDI Out MPE Mode 4
Sweet. Are you getting coins to activate like a finger press? I had to add the taped on guitar string to make it work…
like an antenna that could provide extra free electrons that compete the screen circuit electronics.
Coins by themselves don’t do anything, touching the coins works but goes a bit haywire, don’t have any guitar strings but will see what I can scavenge 🕵️♂️
A bit of stranded copper wire is probably the best because the guitar string is too rigid. I was effectively sliding the
“watch battery” onto a new note. That’s not really latching but it was interesting to see if “human touch” could be replaced
with a piece of metal… I was expecting to need to attach the string to my body and I started by putting the ball end in my mouth.
Wow! Sorry I missed this first time around. One of your very best. I’m trying to picture you and @McD with all of this assorted electrical apparatus wired to various body parts. Nothing sexual, of course. I’m reminded of Young Frankenstein. It’s alive!
Good idea… probably better to report those experiments on another forum: r/ipad_anal maybe. Thanks for the suggestion.
Did I mention my engineering degree was 50% electrical and 50% computer engineering?
I tried to check out that Reddit site: iPad_Analysis, but they wanted me to sign up and post a selfie, so I took a pass. My degree was in Ancient Babylonian Choreography. Not many opportunities, so I ended up doing some coding. Have you ever seen the last page of the Sunday paper where they show grocery product shots. That’s Kwikee Local Server. That’s me! Everybody loves a Kwikee.
Fascinating... and a very nice performance!